DKIM (DomainKeys Identified Mail)
The RR Tech Service Management (R-Service) system allows you to sign outgoing emails with the DomainKeys Identified Mail (DKIM) key, created for your organization. The DKIM signature increases the security of the email and prevents its substitution.
It is recommended to use the DKIM key created for your organization for all outgoing emails. If the DKIM key of your organization's domain is not used, the RR Tech Service Management (R-Service) system signs all emails with the default DKIM key:
d=r-service.tech.
The DKIM key signature for outgoing emails from your organization's space in the RR Tech Service Management (R-Service) system can be configured as follows.
Creating a domain key
In the "Email Policy" section of the settings console, click the Configure DKIM button. A pop-up window "Generate new DKIM keys" will appear:
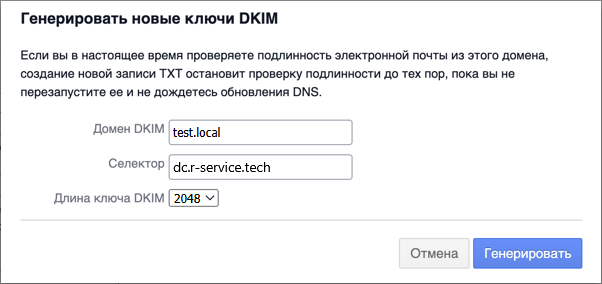
Fill in the following fields:
- DKIM domain: the public domain name used by the RR Tech Service Management (R-Service) system to send email notifications;
- selector: By default, the name of the space, but it can be any text value;
- DKIM key length: 2048 by default.
Click on the Generate button.
The "Enhanced Outgoing Email Security (DKIM)" pop-up window will appear:
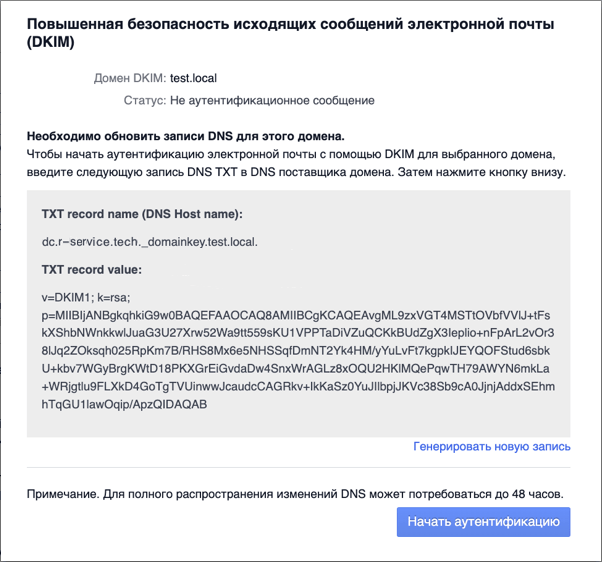
Copy the name and value of the TXT record. You will need them for the next step.
Add the domain key to the DNS record
Create a new DKIM record on the external domain's public DNS server. How to do this depends on the DNS service provider.
Follow these steps to check the new DNS settings for the DKIM record:
- Online tools
There are many online tools for verifying a DKIM record, for example, dmarcian and mtoolbox.
- Microsoft Windows
Run the following command:
nslookup -type=txt <selector>._domainkey.<dkim-domain>
- Unix-based OS
Run the following command in the terminal window:
dig <selector>._domainkey.<dkim-domain> TXT
For example:
$ dig +short default._domainkey.r-service.tech TXT
After creating a new DNS record, proceed to the next step.
Enable DKIM authentication
In the "Email Policy" section in the settings console, click the Configure DKIM button. A pop-up window "Enhanced Outgoing Email Security (DKIM)" will appear (see screenshot above).
In the pop-up window, click Start Authentication. The "Email Authentication (email)" status that appears after that, indicated by a green check mark, means that the DKIM settings and DNS record have been successfully tested and are working correctly.
To close the pop-up window, click outside it once.
To complete the DKIM setup, press Save at the bottom of the "Email Policy" section in the settings console.